
Connecting Cable to The Antenna
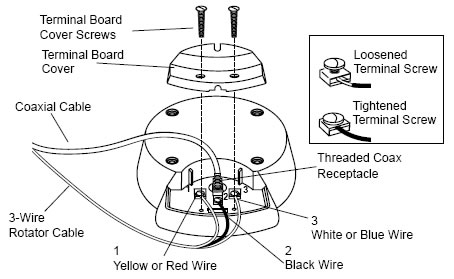
- Loosen the two screws on the terminal board cover on the bottom of the antenna. This will expose a threaded coaxial receptacle and three special screw-type terminals.
- Screw the supplied coaxial cable’s lead-in connector onto the threaded terminal. Caution: Be sure the center conductor of the cable is in the hole of the F-connector before tightening.
- Your cable may have either Yellow/Black/White wires or Red/Black/Blue rotator wires.
- Replace the terminal cover so that the coaxial cable comes out through the notch. Tighten the terminal cover screws. This will clamp the rotator cable in place.
Note: Only loosen clamping terminals up to two turns, as backing them out further can cause the screws to become unattached from their internal mounts. Fasten the Yellow or Red rotator control wire to terminal 1, the Black wire to terminal 2, and the White or Blue wire to terminal 3. Insert the wire between the upper and lower
clamps of the terminal body. Tighten the screw as shown.
- Attach the antenna mounting bracket to the four slotted metal inserts on the bottom of the antenna using the four screws and lockwashers provided. (Do not unscrew recessed metal inserts. They hold the internal motor in place.)
- Insert the U-bolt into the mounting bracket using the two washers and hex nuts. Do not tighten.

Boat or RV—The optional RV/boat mount brackets will let you install the HDMS9100 antenna on your RV or boat. It is recommended that several locations be tried to find the one that provides optimum performance before you permanently install the antenna.
Mount the antenna as high as practical and as far away from metal objects as possible. If the interior areas of the vehicle or boat are substantially enclosed or surrounded by metal surfaces, an exterior mounting location must be selected. For RVs with metal roofs, the antenna should be mounted at least six inches above the roof surface. Your optional mount brackets are the correct height. For boats, best reception will be obtained if the antenna is mounted above the boat’s highest deck or cabin structure, RV/boat mount kits are aailable to do these installations.
Note: Mount the antenna before you make any receiver connections or plug it into its power source. Indoors—You can install the antenna on a vertical mast in the attic, closet or other out-of-the-way location, or suspended from an attic support with a wall-mount bracket. You can also insert the three antenna legs into the matching holes on the underside of the antenna so that they angle outward to form a tripod support. Then place the antenna on a shelf in a closet where it cannot fall or become damaged.
Outdoors—Install the antenna outdoors away from trees or obstructions. (Higher frequencies are affected by obstructions.) Mount the antenna on a mast and secure it by tightening the hex nuts evenly onto the U-bolt. You can also use our off-set J-Mount model UAM9000 (optional). Use a wall-thru tube to neatly route the cable thru walls.
Make sure the installation of the antenna conforms to local electrical and building codes, zoning requirements and other applicable laws and regulations. If you are unsure, contact your local electrician or building inspector for assistance. You will need the additional hardware to install your RV/Boat mounting brackets:
8 – #10 screws (OR 8 each of #10-32 bolts, nuts and 1¾” diameter washers) [screws or bolts of appropriate length depending on roof material thickness]
Gasket for cable
Cable clips (if necessary)
Caulking compound
Tools recommendations: Pencil, Tape measure, Electric hand drill, Drill bits (including a ½” drill bit), Screwdriver and/or adjustable wrench.
- Select a location for the antenna. For added support, locate the antenna mount so that at least four of the eight #10 mounting screws will go into roof studs. An alternative method is to use eight #10-32 bolts with backup washers and nuts.
- Make cable connections to the Mini-State Antenna as described in the Mini-State Antenna Installation Manual.
- Mount both of the mounting brackets to the Mini-State Antenna using the four #10-32 screws and lock washers provided with the antenna. Position antenna on mounting brackets so that when installed, the arrow marking the front of the antenna will be facing the front of the vehicle with the antenna cable toward the rear.
- Select a convenient location to mount the antenna, and mark the position of the eight mounting holes on roof using the mounting brackets with antenna attached as a template.
- Drill the eight mounting holes through the roof material using the appropriate size drill bit for the hardware being used.
- Apply caulking compound around mounting holes on underside of mount, and attach mount to roof using #10 hardware and tighten with screwdriver or wrench.
- Select a convenient location for antenna cable entry and drill a ½” diameter hole in that location.
- Feed cable through the ½” hole using a gasket and caulk at the entry point, and using cable clips as necessary to support the cable.
- Run cable along interior of RV to desired location of Mini- State power supply unit, and make connections.