
Most VESA TV wall mounts are pretty straight forward and simple to use. Setting up the mounting plates can be rather confusing depending on which mount you have and what hole pattern you are setting up.
Lets start with the Barkan Model30.

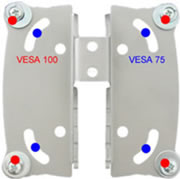
This mounts works great with all of our wall mountable TV’s. Using the the holes marked with blue dots for TV’s with VESA 75 or the holes marked with red dots for mounting TV’s with VESA 100 hole patterns.This mount is pretty straight forward. Attach the butterfly plate to the TV using the screws that were included with the TV. If the TV didn’t come with four mounting screws then it is acceptable to use the included screws and washers that came with the mount.Once the wall hanger is mounted securely in place, simply lock the butterfly plate into place on the wall hanger.

The Barkan MODEL31 hole patters are the same as the MODEL30 but the mount is down angled rather than fixed flat.
Mounting is simple. Attach the butterfly mounting plate to the back of the TV. Anchor the wall plate to the wall stud. The last step is to slide the butterfly plate into the wall bracket. You will see the thumb release clip lock the butterfly securely into place.
Using the included allen wrench loosen the pivot bolt to adjust for the desired amount of tilt.
Beginning with this MODEL31 and continuing through MODEL34 Barkan utilizes the “Quick Thumb Release” system. Simply press the ABS plastic thumb release and lift the TV off of the wall bracket.
Let’s move on to the MODEL32 VESA TV wall mount.
As shown here, this mount as the others will work well with VESA 75mm & VESA 100mm hole patterns.Simply attach the butterfly mounting plate to the TV’s back using four of the included screws and washers.To fix the mounting base to the wall, the plastic shroud must be removed. Gently we can work the two pieces apart. They’ll pop right back together once the base has been secured.

Once the base is securely fastened to the wall stud the cosmetic shroud can be reattached. Holding both pieces flat against the wall move them into place being careful to align shroud clips properly. Now firmly press the two pieces together.Now guide the TVs bracket into the “Quick Release” thumb clip on the base. Watch for it to lock into place and your done!**NOTE** When using this mount (MODEL32) with the Skyworth SLC1569A TV/DVD Combo it is necessary to trim the VESA 100mm hole pattern from the butterfly part of the mount. This will help the mount clear the slight raising of the DVD player on the rear of the SLC1569A.
Both Model33 and Model34 use the same butterfly plate. Preparing for the VESA 75mm pattern is simple. Once again just attach the tv mounting plate to the TV using the supplied screws and washers.

Preparing for the VESA 100mm hole pattern will require a bit more patience. Try to compare your progress to the pictures provided for your guidance. You will need two of the curved pieces and these should be fixed to the front of the mounting plate.On each of four small Philips head screws should be a small locking washer and then a medium flat washer.

The screws are then fed through the mounting plate and through the curved piece. A small nut should be threaded onto the exposed end of the Philips head screw. If the curved plate is positioned correctly the small nut will recess perfectly into it, leaving a clean smooth surface to attach the TV to.Now that we have the plate assembled it’s time to attach it to the TV. Use the screw supplied with your television and a few washers from the mount package. Once the plate is attached to the TV and the mounting base is securely fastened to the wall the TV plate can be guided into the base.
Be careful to support the arm of the base while locking the TV into it. Pulling down on the mount will cause damage to the wall. Caution should also be taken to not allow these mounts to come away from the wall while the vehicle is in motion. Not only would this be dangerous for people but the weight of the television swinging from the end of the mount going down the road will put a lot of stress on the bases lag bolts.